Are you looking for a step by step tutorial for how to make a Halloween dreamcatcher? Maybe you’re looking for on trend, DIY Halloween decorations? Looking for classy Halloween decor ideas? Well, you’ve come to the right place!
We’re going to show you the entire step by step tutorial for making a boho Halloween dreamcatcher that can act as a front door wreath or wall decor. This Halloween decoration is a fun DIY craft for kids, teens or adults.
What makes this dreamcatcher so spooky cool is that the dreamcatcher area looks like a spider’s web. There is even a spider laying in wait for an unsuspecting victim! That’s why we call it the NIGHTMARE catcher!
This complete tutorial will show you how to make a Halloween dream catcher step by step with lots of photos and inspiration. Our finishing touches make this DIY Halloween dream catcher look professionally made! So be sure to check out the entire tutorial.
We didn’t use traditional Halloween colors for this Halloween dream catcher craft but you can make yours any color you want. We thought all black was really spooky!
Your imagination is the only limitation! Take some creative liberties to make your dream catcher your unique Halloween style! Okay…let’s see how the final Halloween nightmare catcher turned out!

How Cute is This EASY Halloween Dreamcatcher!?!?


DIY EASY Halloween Dream Catcher
This super cute and on trend boho Halloween dream catcher displays an array of textures with glittery spiders, feathers, ribbon, rick rack, deco mesh, sequins & mesh tubing. Layer it all on for a spooky vibe! Many of our dreamcatcher materials came from the dollar store which makes this a really fun and easy dollar store craft! This dream catcher was meant for our front door so it is on the larger size but you can scale it up or down with the size of your embroidery hoop and black doily!
Materials:
- 14 Inch Embroidery Hoop
- 12 Inch Black Doily
- Plaid Acrylic Paint in Gloss Black
- Black Mesh Tubing
- Black Deco Mesh
- Black Rick Rack
- Black Ribbon With Varying Widths & Textures
- Small Fake Spiders
- Large Spider
- Black Embroidery Floss
- Black Flowers (optional)
- Darning Needle
- Hot Glue Gun
- Paintbrush
- Scissors
- Tape Measure
How to Make a Halloween Dream Catcher

STEP 1: Paint the Embroidery Hoop Glossy Black
Gather up all of your supplies. Paint the 14 Inch Embroidery Hoop with Gloss Black Acrylic Paint. These embroidery hoops soak up a fair amount of paint and it seemed like two coats looked best.

STEP 2: Cut Ribbon to Length & Do a Dry Mock Up
While you’re waiting for your embroidery hoop to dry you can start cutting all your Black Ribbon With Varying Widths & Textures, Black Mesh Tubing, Black Deco Mesh and Black Rick Rack to length. I used 30 inches for all of my lengths but you can make them longer or shorter based on your taste. I would air on the longer side…you can always make it shorter later if you need to.
I find it helpful to lay out the complete arrangement of the dreamcatcher before I glue ANYTHING down. I want to make sure I have enough material, the right lengths and that it looks full. Here is what my layout looked like.

STEP 3: Hot Glue Largest Width Items First
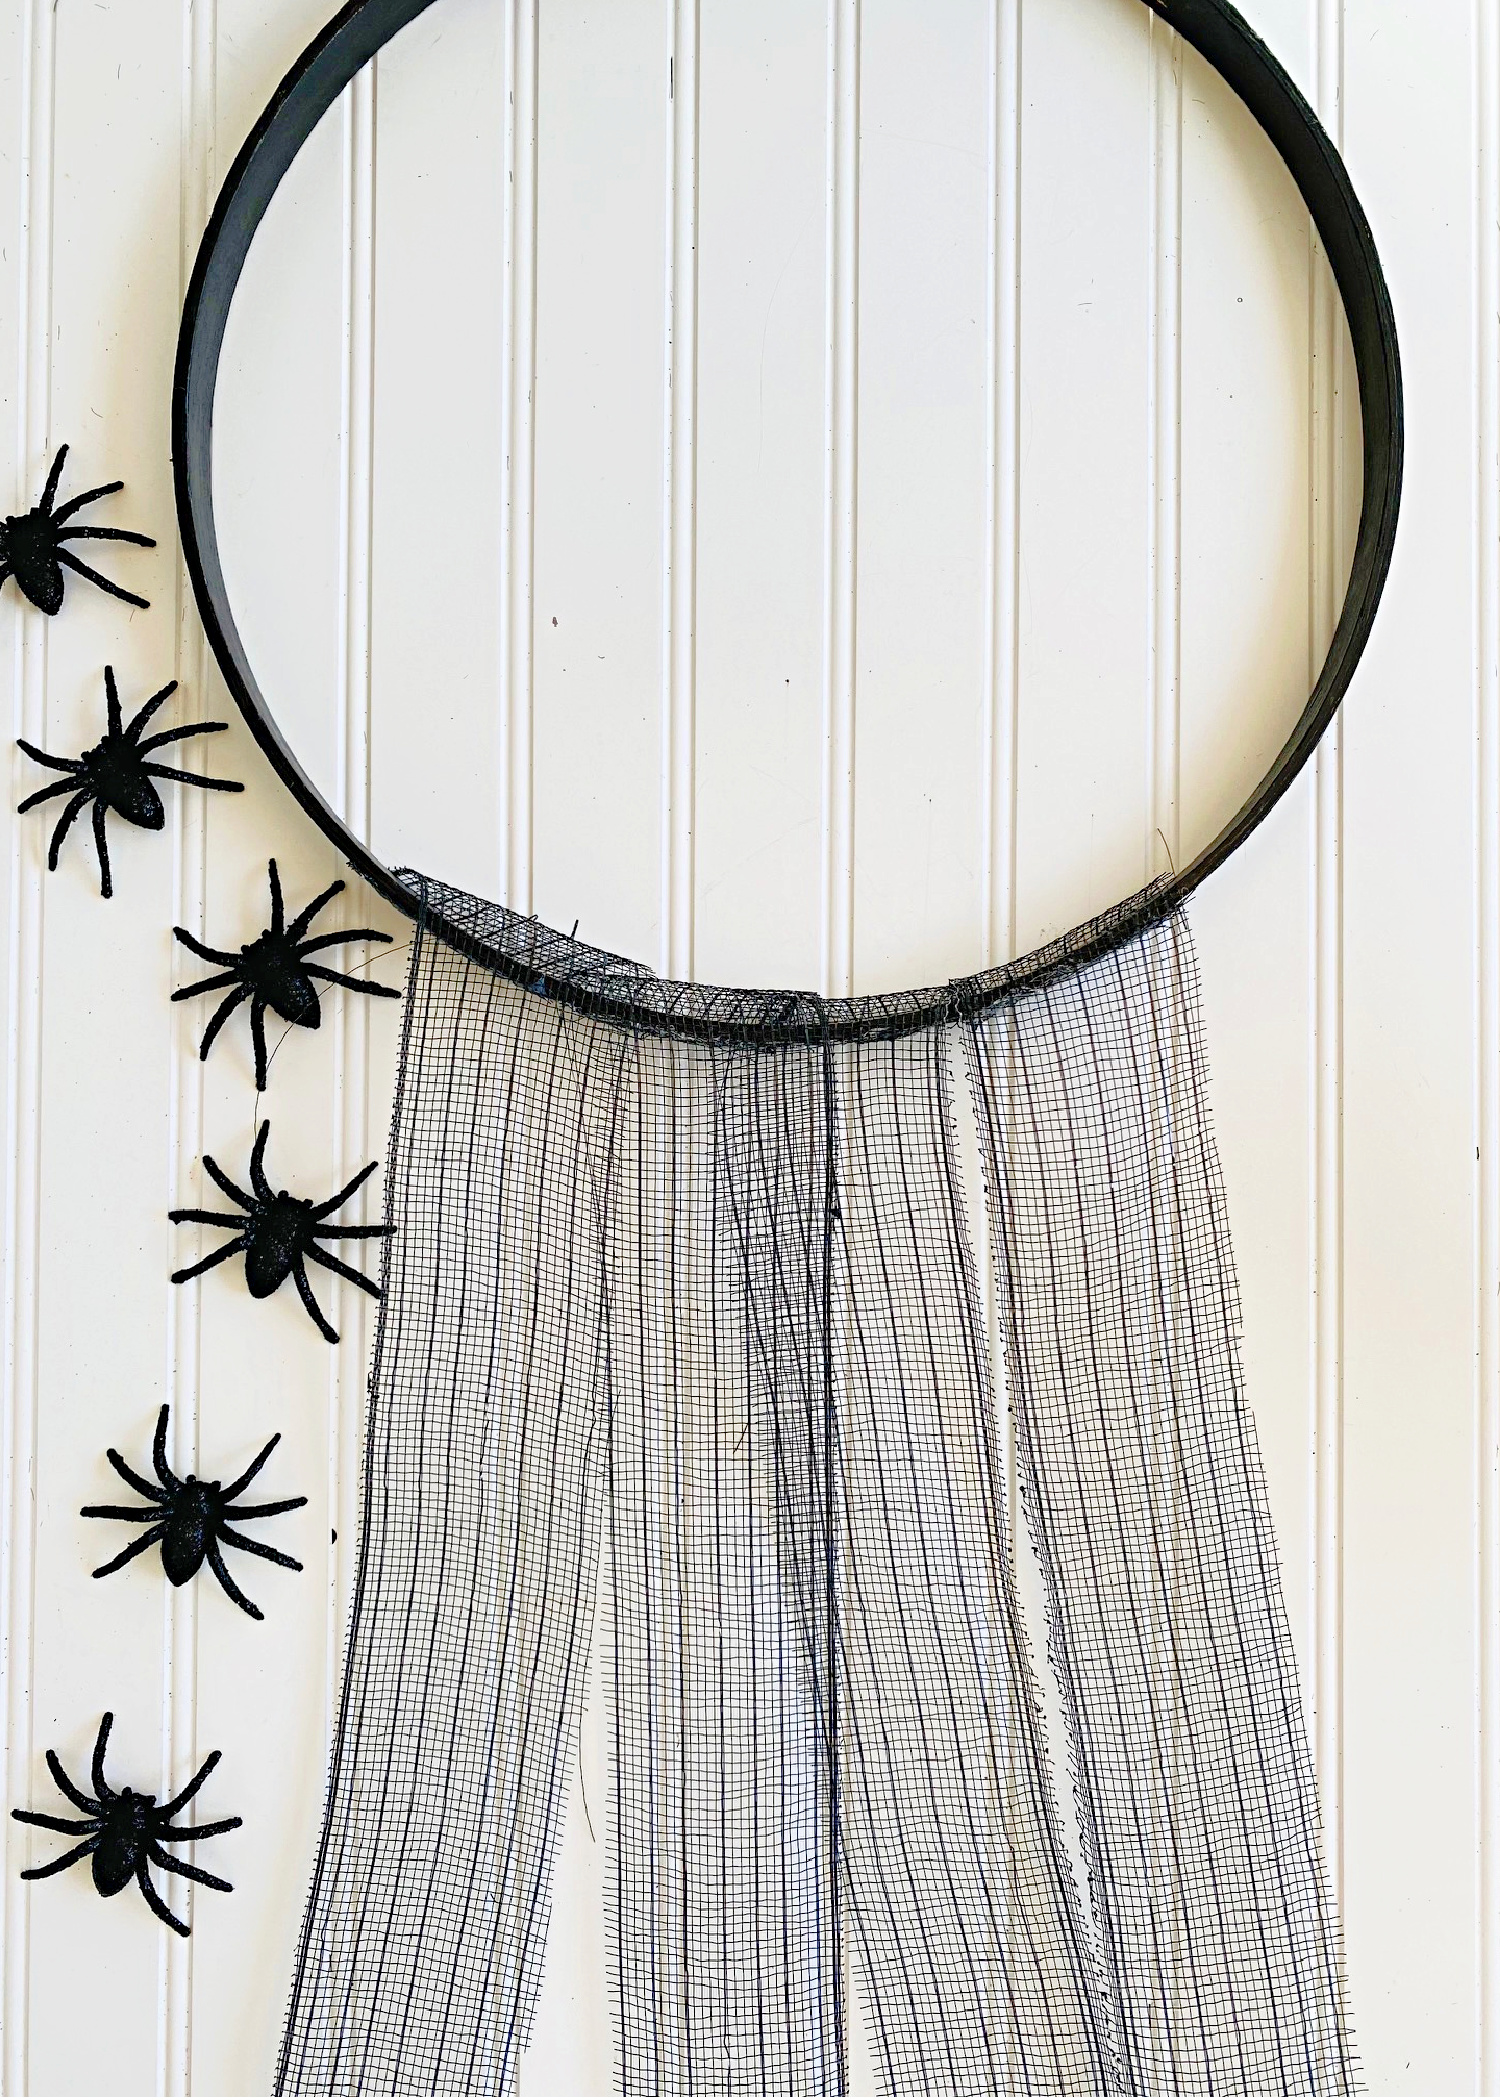
When your embroidery hoop is completely dry you can start hot gluing on all the ribbon and deco mesh to the outer hoop. You want to start with the items that have the widest width first. In this case it is the Black Deco Mesh.
I split all my Black Deco Mesh right down the middle with a pair of scissors so that they were about 3 inches wide. Hot glue the Black Deco Mesh to the underside of the outermost embroidery hoop (the hoop that tightens). Wrap the mesh around the hoop so you have a nice clean look (see image below) and the hot glue isn’t seen.


STEP 4: Continue to Add More Layers
Continue to hot glue on successively more narrow layers…saving the narrowest items for last like the Black Mesh Tubing and Black Rick Rack. Continue to glue to the underside of the hoop and wrap around the hoop once to hide hot glued areas. Spread out your elements evenly.

STEP 5: Attach Black Doily to Inner Embroidery Hoop
Next, we’re going to attach the 12 Inch Black Doily to the inner hoop with Black Embroidery Floss. Thread the embroidery floss through a Darning Needle and double knot the ends. Tie the end of the embroidery floss to the inner hoop with a double knot. Make this knot sit on the back side of the hoop. Weave the floss through the black doily, attaching it to the hoop.

You may need to make small adjustments to the tightness of the floss so that the doily remains centered and taught. Make sure you have it nicely centered before tying a double knot to finish.

STEP 6: Secure the Doily with Hot Glue to Finish Dreamcatcher
To keep the dreamcatcher taught we want to put a couple of dabs of hot glue on the knots to keep everything from moving or shifting down the road. Try to do this on the back side of the hoop where it won’t be seen.


STEP 7: Plate Inner Hoop Inside of Outer Hoop & Tighten
We’re almost done with this SPOOKY BOHO Halloween dream catcher! Place the inner embroidery hoop (with the doily) inside the outer hoop. Tighten the outer hoop screw so that the ribbon and inner hoop are secure.

STEP 9: Hot Glue Spiders to the Dreamcatcher Ribbons
Grab your Small Fake Spiders and hot glue them to pieces of ribbon. I found some glittery spiders at the dollar tree but you can use any kind or size you like.

STEP 10: Attach a Large Spider to Dreamcatcher Webbing
Using Black Embroidery Floss, tie the spider to the dreamcatcher. I attached my spider in two places with the floss to keep him from moving around too much (both were attached to the doily). If you don’t like the spider you could use an arrangement of Black Flowers instead. I personally like the spider because the doily looks like a fancy spider web!

STEP 11: Trim Excess, Hang Your Halloween Dreamcatcher…Enjoy!
You may have ends of the ribbon and mesh that are too long. You can leave it as is for a spooky look OR trim everything to be nice and even. I left mine a bit jagged because I thought it had that haunted house look to it but do what you think looks good. If you love the 3D bats be sure to check out my FREE Printable Wall Bats DIY HERE.
I hope you enjoyed learning how to make a Halloween Dreamcatcher (or NIGHTMARE CATCHER)! This is one of my FAVORITE Halloween decor ideas. Boho is so on trend these days. Why not add a little something fun like this to your Halloween decor!
If you love Halloween crafts and DIYs as much as we do you might want to check out some of our other tutorials like our FREE Printable 3D Wall Bats, Tassel Ghost DIY Garland, DIY Sweater Pumpkin Tutorial (the easy way) or the Hocus Pocus Sanderson Sisters DIY Luminary Jar +FREE SVG & Main Street Mickey Mouse Foam Pumpkin DIY + FREE STENCIL
Save This Halloween Dreamcatcher DIY for Later on Pinterest!

A glue gun in one hand, a whisk in the other- that's me in a nutshell! I'm the heart and soul behind acountrygirlslife.com. I've been crafty since childhood so I'm your go-to girl for everything crafty, delicious, and DIY. From clever crafts & printables to mouth-watering bakes- I believe in sprinkling a little handmade magic into every day. I'll help you find your creative niche at home!


Leave a Reply