Do you want to learn how to dry sunflowers? Are you wondering if you can dry sunflowers? Would you like to use them for crafting, gifts or seeds for next year but don’t know where to start? Have you tried to dry sunflowers in the past but you were left with moldy sunflower seeds and sunflowers?
These are all common issues and questions when it comes to how to dry out sunflowers. This article will tackle all of these topics in great detail but make no mistake, right now is the perfect time of year to cut back your sunflowers and get them drying!
Are you the type of person who prefers to watch a video over reading a wall of text? Well then! We made this short video for you! It’s just an overview so we recommend that you come back and check out all the details of our article if you decide to start drying your own sunflowers!

If you’re anything like me you’ve been patiently waiting all summer for your sunflowers to bloom. We’ve really had a banner year with our sunflower patch. We grew several varieties which produced weeks worth of enjoyment well into October. Sadly, they are beginning to fade as we head deeper into fall….which brings me to the main topic of my post!
First let me answer an obvious question you probably have at this point…
Can you dry sunflowers?
Yes, you can dry ANY kind of sunflower (even those GIGANTIC ones) but there are some important considerations to take into account to successfully dry your sunflowers. If you don’t take these careful considerations you’ll mostly likely end up with moldy sunflower seeds and sunflower heads. Follow our step by step DIY tutorial below to ensure success!
If you’re wondering what to do with dried sunflowers you already have…don’t worry…you’re still the right place! Here is just a short list of everything you can do with sunflowers (including some DIY sunflower crafts we’re going to show you):
- Make a front door wreath (we’ll show you how)
- Dry sunflower heads for fall decorating or decoration (we’ll show you how)
- Toast the seeds for eating or gifting
- Dry seeds for planting next season (we’ll show you how)
- Give away dried seeds as an inexpensive garden gift for friends, neighbors or family (which we’ll show you how to do too!)
- Dry seeds for feeding wild birds or chickens
Drying sunflowers is EASY! Just keep our following step by step tutorial in mind as you harvest your sunflowers! You’ll learn how to dry a sunflower properly that won’t mold and can last for years to come. We’ll even show you two easy DIY sunflower craft projects you can make with sunflower seeds and sunflower heads. So let’s get started!
This post may contain affiliate links. See our affiliate disclaimer here.
|How to Dry Sunflowers|
If you came to our little corner of the internet with the singular question of “how do you dry sunflowers?” then this part of our article is 100% for you! You’ll just need a few things to get started…
Supplies for Drying Sunflowers:
Step 1: Selecting “Dry” Flowers For Harvest
It’s really important to keep in mind that the head of the sunflower contains a LOT of moisture. Sunflowers even contain a substance similar to tree sap which is really sticky! Given the high level of moisture & sap it’s best to wait as long as possible before cutting the flower head.
If harvested too early you could end up with MOLD forming on the back of the flower head because it cannot disperse all of the moisture quickly enough. This has happened to me several times….so I can share with you exactly when to harvest.
Whether you are harvesting from your garden or from the grocery store you’ll want to wait for all the flower petals to completely dry up and fall away if possible. Remove any dry petals that haven’t fallen yet.

After the petals have dried and fallen away you’ll want to “test” to see if the flower is ready. The test is pretty simple. Simply rub a finger over the center of the flower where the seeds are. If the pollen heads fall away under the pressure of your finger it’s time to harvest.

I live in the pacific northwest and we see a large amount of early fall rain. I usually have to harvest my flowers earlier than I’d like so they aren’t completely soaked with excessive moisture from rain water. You’ll want to do the same if you live in Washington or Oregon. Regardless of where you live, harvest your flowers after you’ve had a few days of sunshine/dry weather if possible.

2. Remove Sources of Moisture from the Flower Head
As I mentioned earlier, these suckers contain a lot of moisture and sap. Therefore we need to remove as much of the moisture from the flower as possible. This means we need to take all the pollen heads off of the seeds and remove any remaining dry petals. If these are left intact on the flower head you’ll most likely be left with a moldy flower head from trapped moisture.
The pollen heads are removed by simply rubbing them off with a finger (see previous photo). The pollen heads in the very center of the flower are usually the toughest to remove….especially if you have to harvest early. Leaving a small amount of pollen heads in the center is okay. You can usually scrape those off after the flower head has a few days to dry. The flower head should look like the below photo when complete:


3. Hang Flowers Upside Down w/Twine in a Warm Area
You’ll want to hang the flowers upside down to dry out completely in the warmest area possible with jute twine. Keep in mind that garden flowers will most likely have spiders and bugs so inside the house may not be the best area. Unless you have a high tolerance for spiders, I suggest hanging the flowers in the garage or a green house if you have one.


Make sure there is plenty of airspace between each flower head. If one flower head is leaning against another there is the potential for mold to form in between them. It can take anywhere from 3-5 weeks to dry the flower head completely. Drying time depends on the size of the flower head, room temperature & humidity.
Once you actually have the dried sunflowers in your hot little hands there will be a few cool things you can do with them. We have a few DIY sunflower crafts to share with you near the end of this post.

4. Remove Seeds From Flower Heads (Optional)
When the flower heads are completely dry they should look similar to the below image. The formerly green, leafy areas have turned brown. The seeds are dry to the touch. The flower head can be removed from the stock at this point.

If you want to harvest the seeds, simply remove the seeds from the flower head and place them on a dry paper towel in the warmest place you can. Dry the seeds for two more weeks. This should ensure that any moisture remaining in the seeds are drawn out. If your saving the sunflower seeds for eating you can skip the paper towel & toast them in the oven immediately.
5. Packaging/Gifting Seeds For Next Year
I love saving seeds for the next growing season. There’s something to be said about doing things the way my grandmother and her mother and her mother’s mother used to do it. There’s a link to history & self-sufficiency that makes me feel good about seed saving.
It’s really easy to dry and save seeds and if I do it every year I won’t have to buy seeds ever again. Needless to say, I highly encourage you to at least try seed keeping. Maybe start with something easy like sunflowers (you can make some really sweet diy sunflower gifts with them which will cover in a moment), pumpkins or tomatoes and work your way up from there.
There’s really only one necessary supply needed….seed envelopes. It’s worth the investment to put your seeds in a dry secure place. I use the self-sealing Proterra Craft Paper Seed Envelopes which you can find on Amazon. They’re heavy duty and seem to be able to absorb small amounts of moisture. They look great decorated as a gift too (as I will demonstrate here shortly)!

|How to Make Christmas Gift Seed Packets|

If you’re looking for sunflower diy gift ideas this is fun, easy, budget friendly and can be made in bulk for neighbors, co-workers or friends.
Even if you don’t have dry seeds ready to go you can still give a beautiful DIY garden gift! Check out the wildflower seed mixture available year round (in large quantities) to fill your seed envelopes HERE. Below I’ve linked to everything else you’ll need to create a beautiful DIY gift like you see above. You can click on any of the links below for easy shopping:
DIY Christmas Gift Seed Packet Supplies
- Proterra Craft Paper Seed Envelopes
- Sharpie Metallic in Gold
- Hero Arts Shadow Ink in Cup o’Joe Brown
- Floral or a Christmas Themed Stamp
- Craft Paper Gift Tags
- Red & White Bakers Twine
- Clear Quilting Ruler
- Fresh Sprigs of Cedar, Pine, Thyme or Rosemary
- Wildflower Seed Mix in Bulk
1. Gather Your Supplies


2. Stamp Your Proterra Craft Paper Seed Envelopes
I really like the monochromatic color scheme between the craft paper seed envelopes and the cup o’ joe brown ink. The colors work well together for a natural hand made garden gift like this. You can use the clear quilting ruler to help align the stamp parallel to the edges of the seed envelope.

3. Label Seed Packet with Sharpie Metallic Gold Marker
This is probably the trickiest part of this DIY because not all of us have beautiful handwriting. I like to use a clear quilting ruler to align my writing with the bottom of the seed envelope.
If you’re really concerned about the presentation you can always write on the back of the envelope which won’t be seen until the envelope is actually opened. Another option is to print out a separate label using your printer and affix it to the back or front.
I find it’s also helpful to note the year. Usually you write the year for planting….not the actual year the seed is harvested. It’s 2021 so you would write 2022. Seeds keep for 1-2 years so it’s good to know if they are still viable by having a date on the envelope.


4. Wrap Seed Packets w/Bakers Twine, Attach Tag & Greens
Wrap the seed packets in bakers twine several times & tie one knot at the center. Attach the craft paper gift tag and tie a second knot to secure. Tuck one small sprig of greenery behind the bakers twine.

What a quick and easy little DIY Christmas craft! But don’t limit yourself there! What about giving away pumpkin seeds at your next spooky soiree? Just substitute a fall or Halloween themed Stamp!
Need an inexpensive Wedding party favor? Substitute a stamp appropriate for your wedding theme and fill your envelope with those wildflower seeds I mentioned earlier (sold in bulk online year round).


|How to Make a Simple Dried Sunflower Wreath|

We think you’ll love this sunflower wreath DIY. There are just a few supplies you’ll need to get started.
DIY Sunflower Wreath Supply List:
- Sharp Hand Pruners
- Jute Twine or Satin Ribbon
- 15-20 Dried Sunflower Stems with flower heads of varying sizes
- Dried Vine Wreath
- Floral Adhesive
1. Gather Your Supplies
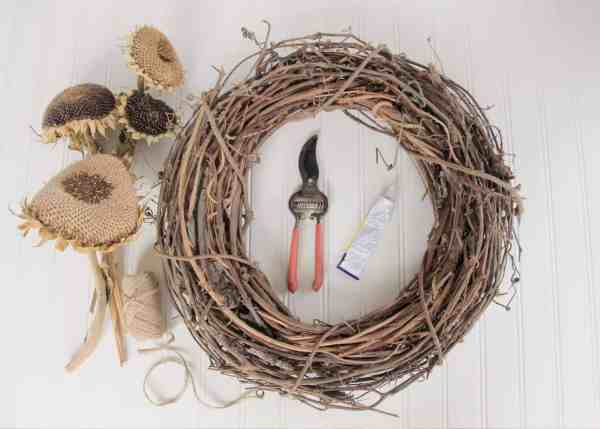
2. Trim Stems & Dry Fit Flowers in Wreath
Using sharp pruners, trim your dried stems to about 5″ in length. Before you glue a single flower down you’ll need to complete a “dry fit” of all the flowers. If you start gluing flowers down without figuring out each flower’s proper place….you’ll find that you are re-working flower placement over and over again and wasting a lot of glue!
It’s best to start with your largest sunflower head and use it as your centerpiece for the wreath. Add flower heads of various sizes and colors together. Use smaller flower heads to fill in empty areas.

3. Glue Flowers to Wreath Using Floral Glue
When you are satisfied with the look of your “dry fit” wreath you’ll want to go and glue down all of the flowers using floral glue. Carefully remove each flower one at a time and add floral glue to the stem. Tuck the stem in the same area you had it before.


4. Loop Jute Twine on Back of Wreath & Hang
There are a variety of things you can use to hang your wreath but I prefer the look of jute twine because it matches the wreath color and the flowers.

I hope you’ve learned to how to preserve sunflowers, enjoyed our detailed DIYs and feel encouraged to try seed saving. It’s easy and rewarding! In most cases you’ll have more seeds than you can possibly use. So why not share with your friends, co-workers, neighbors & family!
If you enjoyed our DIY sunflower wreath you might want to check out some other recent dried wreath tutorials we’ve posted. If you’re looking for another fall wreath idea then you’ll want to check out our super easy but super Elegant Dried Corn Husk Wreath. We also have a tutorial on how to create a Dried Hydrangea Wreath which is more of a spring or summer wreath BUT it has to be dried and assembled late summer/early fall when the hydrangeas are almost done blooming.
LOVE Garden DIY AS MUCH AS WE DO? Get our projects in your inbox as soon as they drop! Sign up tor receive our periodic emails with links to our latest posts. Scroll to the bottom of this page and leave us your name and email!

How to Organize Your Garden with a DIY Gardening Binder
How to Dry Hydrangeas (That Won’t Crumble) for Wreaths & Decor
How to Make an EASY Fall Corn Husk Wreath With Tamale Wrappers
The Beginners Guide for EASY to Grow Garden Fruits & Vegetables
How to Build Out a Back Friendly Ergonomic Veggie Garden

A glue gun in one hand, a whisk in the other- that's me in a nutshell! I'm the heart and soul behind acountrygirlslife.com. I've been crafty since childhood so I'm your go-to girl for everything crafty, delicious, and DIY. From clever crafts & printables to mouth-watering bakes- I believe in sprinkling a little handmade magic into every day. I'll help you find your creative niche at home!


Leave a Reply