Are you looking for quick and EASY DIY Halloween garland ideas? Need last minute, cheap Halloween décor or decorations for a Halloween party? We have a cute Halloween garland idea that can come together in an afternoon.
Grab some leftover yarn from your craft stash, a trashy young adult fiction book and a pair of scissors…we’re going to whip up a cute yarn ghost garland to hang on your mantle, around your doorway or above the food table at your next Halloween party!
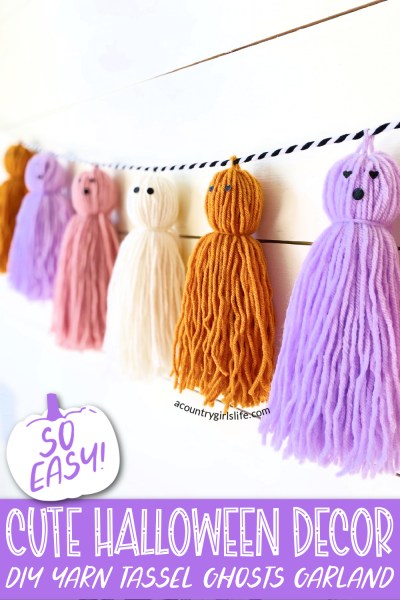
We’ll make large tassels out of yarn and add faces to them so they look like ghosts. Some crafters call these tassel ghosts. You can make them just about any size your want by making a small adjustment during assembly time. We’ll talk more about that later in this step by step tutorial.
We used non traditional Halloween colors like pink, burnt orange and lavender because we love fun, bright Halloween crafts and decor around here. You don’t have to be like us! You can make all white yarn ghosts or any color combination you want.

Let’s check out how this EASY DIY Halloween garland turned out!


DIY EASY Halloween Garland With Yarn Ghosts
This quick and easy DIY Halloween garland comes together quickly. Each yarn ghost takes about about 5 minutes to make. You’ll be able to pop them off in assembly line fashion once you get the basic method down. The size of the ghost is determined by the size of the book you use to make them. If you want smaller yarn ghosts you may want to use a smaller book than I did.
Materials:
- Yarn in Halloween Colors
- Heart Shaped & Standard Hole Punch
- Black Sparkle Scrapbook Paper
- Black and White Bakers Twine
- Large Hardback Book
- Scissors
- Tweezers
- Hot Glue Gun
- Ribbon, Halloween Embellishments & LED Mini Lights (Optional)
How to Make Halloween Yarn Ghosts

STEP ONE- Wrap Yarn Around The Right Sized Book
Gather all of your yarn ghost supplies and a good sized hard backed book. The size of the book will determine the size of your ghost. I used a book that was roughly 9″ x 6″ x 2″ and that yielded a yarn ghost that is 8″ long. If you want a smaller ghost then you’ll want to use a smaller book.
Cut a length of yarn that will span the entire length/spine of the book and tuck it into the center of the book on each end. This piece of yarn is how you will tie together all the numerous pieces of yarn together. By tucking it into the book we can hold it in place while we complete the next steps

STEP TWO- Tuck The End of the Yarn Into the Center of the Book
Were about to start wrapping the yarn around the book to make our ghost. We need to secure the end of the yarn. You can tuck it into the center of the book or use a piece of tape to keep it from moving around.

STEP THREE- Wrap the Yarn Around the Book About 70-80 Times
With the end of the yarn secure we will wrap the yarn around the book about 70-80 times to create the tassel. Don’t let the yarn wrapping spread too wide or you’ll end up with a ghost with a very uneven bottom later on.

When you’re all done you should have a wrapped book that looks something like the above picture.

STEP THREE- Tie a Loose Knot Around the Yarn Wrapping
Untuck the length of yarn that you tucked into each end of your yarn and tie a single loose knot. This will help keep the yarn wrapping together as we make a cut in the next step.

STEP FOUR- Cut the Yarn Wrapping on One End of the Book
Grab your scissors and make an even cut down the center of the yarn wrapping while also holding the side of the book with the loose knot. You don’t want 80 pieces of yarn falling all over the place!

STEP FIVE- Tighten the Knot & Double Knot the Yarn Wrap
Go back to your loose knot and tighten it down. Tie a second knot to secure all that yarn. It should start to look like more like a tassel now!

STEP SIX- Tie a Double Knot Around the Neck
Cut a length of yarn and tie a double know around the neck area of the tassel ghost. Our ghost is almost complete! We just need a face!

STEP SEVEN- Create a Face With a Hole Punch & Black Scrapbook Paper
Using a Heart Shaped & Standard Hole Punch punch heart eyes and a round mouth from black scrapbook paper for your yarn ghost’s face. You can use any combination of shapes. I created different faces for most of my ghosts.

STEP EIGHT- Hot Glue Facial Features to Ghost With Tweezers
Your punched facial features are REALLY tiny and hard to hot glue to the ghost. The solution is to use a pair of tweezers to hold the punched pieces and dab with a VERY tiny amount of hot glue. Gently place the facial features on the yarn ghost and pull the tweezers away slowly. Avoid getting hot glue on the tweezers as this can make it difficult to move the tweezers away without ripping out yarn.

STEP 9- Tie Ghost to Bakers Twine & Even Out With Scissors
Using the yarn you tied at the top of the yarn ghost, tie the ghost to the black and white bakers twine. Use some scissors to even out the bottom of the ghost and remove any pieces of yarn that are overly long or out of place.
If you are a quilter, you can use a rotary cutter and clear quilters square to even out the bottom of the yarn ghosts in one pass. It makes this step really quick if you have basic quilting tools.

STEP 10- Add Embellishment to your Complete Ghosts
Now that your garland is complete you can see if you want to add embellishments like bows, plastic bats, spiders, LED lights or whatever else feels right to you in your space. I made a bow tie for some of my ghosts!
MORE DIY Halloween Garland Ideas…

I hope you enjoyed learning how to make yarn ghosts (sometimes called tassel ghosts)! If you love fall & Halloween crafts check out some of our others like the DIY Sweater Pumpkin Tutorial (the easy way) or the Hocus Pocus Sanderson Sisters DIY Luminary Jar +FREE SVG.
Save This DIY Halloween Garland idea for Later on Pinterest!
A glue gun in one hand, a whisk in the other- that's me in a nutshell! I'm the heart and soul behind acountrygirlslife.com. I've been crafty since childhood so I'm your go-to girl for everything crafty, delicious, and DIY. From clever crafts & printables to mouth-watering bakes- I believe in sprinkling a little handmade magic into every day. I'll help you find your creative niche at home!


Leave a Reply