Looking for free printable Happy Planner covers? Need a new cover for your Happy Planner but just don’t have it in the budget? Let us show you how to make your own DIY Happy Planner covers at home! It’s super easy and with our free printable covers you can get started now! You can download our super cute, free Happy Planner covers instantly to print at work or home! You can print in black and white or color because they look beautiful either way! Our free printables are only available for a limited time so don’t delay!
I’ve been making planner stickers for weeks now and I really wanted to get out of my comfort zone this week. I’ve been wanting to tackle making my own DIY Happy Planner covers for some time. After making the fall stickers last week I thought….how cool would it be to easily change out my planner cover for say….a fall themed cover? It would also be sa-weeeet to change out my cover for Christmas, for spring, for summer etc.

I’ve been putting this project off because I’m not sure if there is interest among my readers for a project like this. SO, this is also kind of a test to see if anyone is interested in actually making their own DIY Happy Planner covers at home. If you guys are interested I’m glad to make covers all day long until the cows come home (along with stickers)! Check out how this turned out! I’m STOKED to show you guys all the deets!

So before I get started, let me explain how this DIY article is going to go down. There are two practical ways that I’ve found for you to make your own planner covers at home. I’m going to show you both ways. One method is hard core DIY, super crafty planner covers. The other method is less DIY, less time and less tools but may not be a customize-able as you’d like.
In any case, I’ll share both methods step by step and you can decide which is better for you. This week we’re focused on making covers for the Classic Happy Planner. If there is interest I might try and tackle the Mini Happy Planner covers another week or add it to this article later. You let me know if you’re interested in seeing that by commenting at the bottom of this article.
If you’re looking to make covers for the BIG Happy Planner it may be tough. The covers on the BIG Happy Planners are bigger than a standard 8.5 x 11 print at home sheet of paper.

SO, if you wanted to print a custom cover for the BIG Happy Planner you’d have to go to a custom print shop to have something printed out in that size and laminated on a large format laminating machine. It’s out of scope for this article but just know that it is possible if you have a custom print shop in your area.
This week I’m releasing a FREE printable DIY Happy Planner Cover which also includes a contrasting/matching inside cover. You’ll be able to experiment on your own at home with this ready to print Happy Planner cover. This freebie is only going to be available for a limited time so don’t delay that download!
|Meet the DIY Happy Planner Cover Freebies|
So let’s take a look at what I made for you this week! I really love the colors, design and how this whole project turned out. I’ve done all the hard work to make sure you can produce a quality planner cover that is comparable with what The Happy Planner people produce. As always I love to hear what you think. Leave me a note below in the comments section at the bottom of this page. It really helps me tailor content when I know what you guys like!


Okay, now I’m going to show you two methods for making DIY Happy Planner Covers at home. Let’s start with the supply list for the first method. I’ve hyperlinked to everything I’m using to make for easy shopping.

Note: Most of these items can be found on Amazon and have free shipping with Amazon Prime. If you’re not a Prime member you can sign up for a FREE 30 day trial HERE and take advantage of FREE shipping for 30 days!
120lb Heavy Cardstock Paper
Corner Rounder
Laminating Machine
5 Mil Laminating Pouches
Single Hole Punch & Scissors
Fiskars Straight Line Paper Cutter
Glue Stick
|Step 1: Print Two Outside Covers & Two Inside Covers on Card Stock|
In order to have a thick and substantial cover you’ll need to print on card stock. You’ll want to print on card stock that is 120 lbs weight. I printed the outside planner cover on one sheet of card stock and I printed the contrasting inside of the cover on a separate sheet of card stock (in a later step I will glue the two together so that I can get an even thicker cover).
If you want to make a back cover (which I highly recommend) for your Happy Planner you will have to print two outside covers and two inside covers. The reason I recommend making a cover for both the front and back is that chances are your current cover will not match a new cover. Also, there may be slight size differences that will be noticeable. So plan on making covers for the front and back.

You’ll need to adjust the paper settings on your printer before printing. After pressing the print button go to the settings area. Look at the paper options and choose something along the lines of “card stock” or “other photo paper”.
You’ll need to pick a thicker paper setting so that your printer accounts for this thick paper. It will also be sent a message that it’s printing something high quality and will print the Happy Planner covers as such.
If your printer is like mine there is a separate tray for special papers. Make sure you put the paper in the correct tray and that that the paper is properly aligned.
|Step 2: Glue Outside cover to Inside Cover|

In order to get a super thick cover I want to glue the two sheets of card stock together that I just printed. Remember, one sheet is going to be my colorful outside cover with the writing on it and the other sheet is the contrasting/matching inside cover (the page printed with hearts in this case).
You’ll want to use a VERY SMALL amount of glue for this. I can’t stress this enough…use a glue stick! Dab a VERY small amount in four to five places on one of the sheets and glue them together. Make sure the edges of the two sheets are perfectly aligned. Wait for the glue to dry completely. If you use too much glue or liquid/school glue you will get a hardened bubble between the two sheets that won’t look good.
NOTE! MAKE SURE THAT THE HEARTS ARE POINTING IN THE RIGHT DIRECTION! In my first pass at this I wasn’t paying attention to which direction the hearts were pointing. I glued the hearts upside down on the back cover! So make sure you have everything facing the right direction before you glue!
|Step 3: Trim Away Excess Card Stock|

Now that the glue has dried you’ll want to cut away the excess card stock around the image. The printable covers are the true size of an un-laminated Happy Planner Classic cover.
Obviously you can use plain old scissors to cut away the excess card stock. BUT if you’re OCD like me and want nice, straight lines I highly recommend that you use a straight line paper cutter. They are pretty inexpensive and they really make the difference when you need to cut a straight line. This really inexpensive Fiskars model is highly rated on Amazon.
I have an older than the dinosaurs (and it weights about as much as a dinosaur) office sized paper cutter that I use. I found it, unluckily some would say, at Goodwill in the office supply section.
|Step 4: Round the Corners|

All Happy Planners have rounded off corners and I highly recommend that you round your corners unless you like being stabbed in various places of your body with the corners of your laminated covers. This was something I realized in my various trials of this DIY.
I use this inexpensive corner rounder that I found on Amazon. It works great and the price is even better. After cutting the excess card stock round all four corners of your covers. You’ll also use the corner rounder again in a later step to round off the laminated corners (which will also stab you if you don’t round them off!).
I’ve found tons of uses for my corner rounder when it comes to my Happy Planner….I use it for DIY tabs, dividers, photos and any place I don’t want a sharp corner poking me!
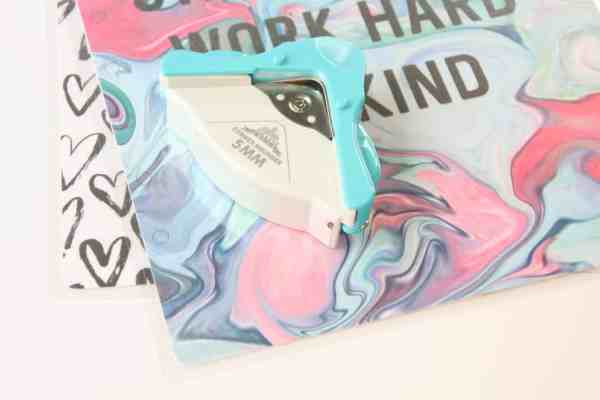
|Step 5: Laminate Each Cover|

Next you’ll want to place each glued cover inside a 8.5 x 11 5mil laminating pouch. Most desktop, at home laminators will melt 3 or 5 mil laminating pouches. I prefer the thicker 5mil pouches because it makes my covers thicker and they last a lot longer under heavy wear.
I really LOVE my super basic laminating machine. It’s nothing fancy and it’s not very expensive (at the time of this writing it’s under $24!). I use it a lot…especially when it comes to my Happy Planner. I laminate almost everything I want to last more than the one year life span of my planner. This includes all the DIY Happy Planner covers I make as well as dividers, photos, half sheets, markers and tabs.
I also like to take the guts from my old planners and re-use them on other planners. Laminating these items allows them to last for years. I also laminated a Happy Planner brand to-do list and I use dry erase markers to make a new to-do list every day. This way I’m not wasting a lot of paper/money.
When you have a laminator you can make a TON of your own Happy Planner supplies using scrapbook paper from craft stores, stickers, photos and ephemera you have around the house. I have a friend who laminated a ton of paper keepsakes from a trip to Disney (like tickets, special passes and paper items she picked up from around the resort). It turned out awesome….and when you think about it….the possibilities are endless for customizing your Happy Planner!
After you’ve placed the front and back cover in it’s own laminating pouch you’ll run them through your laminator per the manufactures directions. This will only take a minute once your machine has warmed up.

|Step 6: Trim Excess Lamination & Round Each Corner|

After you’ve laminated your planner covers you’ll want to cut off excess lamination using the straight line paper cutter. Leave about 1/3″ of excess lamination to remain around your planner cover. You don’t want to break the visible laminating seal that exists about a 1/4 of an inch all the way around your printable planner cover.
After removing the excess lamination, using the corner rounder you’ll want to round off all four corners of your front and back cover. Again, this is so you won’t get stabbed by pointy corners of your new DIY Happy Planner covers.

|Step 7: Punch Your Covers|
On the front cover you will see a row of faint circles. I’ve provided these as a guide for punching holes. Using a single hole punch you’ll punch out each of the 9 circles . After you punch each hole use a pair of scissors to cut a slit from the edge of the cover into the hole you just punched. This will allow you to place the cover on your planner discs without buying a 9 Hole Punch.


Note! You will have to remove a small amount of the laminate with the scissors during this cut. This will allow your cover to move easily across your rings. The amount you will have to remove is equivalent to thickness of the inside of your rings. Start with a small cut and remove laminate until it moves easily around your rings.
This single punch method works just about as well as a 9 hole punch but takes a little more time and patience. I actually have a 9 Hole Punch but I don’t use it on my covers because I find it hard to line up the holes with my guide. I do it by hand and it works just as well!
|Step 8: Place Your DIY Happy Planner Covers on Your Discs|
See! It’s actually quite easy to make your own planner covers! Even if you don’t use our DIY printable Happy Planner covers you can make a HUGE selection of covers for every season and every reason with an inexpensive laminator.

|The OTHER DIY Happy Planner Cover Making Method|
So, if you’re not feeling super crafty or don’t have all the aforementioned supplies there is another method you can use to make your own covers. You can purchase a product directly from the Happy Planner People called the DIY Classic Planner Cover. Fair warning, I haven’t used this product myself but I have read through all the critical reviews on this product and I think you should too.
I think this might be a great solution for some people but maybe not for all people. Some have complained the seal doesn’t keep and that the size isn’t correct to fit the classic. Also, there were some complaints that the cover wasn’t really clear. In any case, read all the reviews HERE and decide if it’s the right product for you.
Consider the price of purchasing this against the cost of a lamination machine and it might make more sense to invest in a lamination machine (especially if you think you might need to buy a DIY Classic cover for the front AND the back of your planner).


I hope you love these super cute, free printable Happy Planner covers as much as I do! Please leave me a comment below and let me know what you think so I can tailor future content! Tell me what colors, images or quotes you’d like to see in a future set of printable covers. There’s a good chance I’ll find a way to fit it in!
If you enjoy what we do here then consider sharing this post on Facebook and Pinterest (sharing buttons are at the top of this post).
If you want to know when we post new awesome stuff like this then consider joining the thousands of email subscribers by leaving us your email at the bottom of the page OR join our Totally Free Printables Facebook Group!
After you download your FREE planner covers check out our other awesome posts:


You Can Use the Image Below to Pin This for Later!

A glue gun in one hand, a whisk in the other- that's me in a nutshell! I'm the heart and soul behind acountrygirlslife.com. I've been crafty since childhood so I'm your go-to girl for everything crafty, delicious, and DIY. From clever crafts & printables to mouth-watering bakes- I believe in sprinkling a little handmade magic into every day. I'll help you find your creative niche at home!


Love te cover
I keep going in circles just trying to figure out how to get the actual free printables, lol
Hi Tammy….read the “important download instructions” just above the download button. It will tell you the coupon code to enter at checkout to receive them for free.
Great instructions. I’m going to give this a try! I already have all the supplies on hand. Thank you!
You’re welcome! Enjoy them!
I love this and the limited time freebies stickers!!! Question that I didn’t get going through the DIY Classic Cover…why print 2 of each download?
Nevermind! Ugh now I see it’s just to print the inside copy twice so you have one for the front and one for the back cover. I thought it was saying to print all twice. Thanks for publishing these!!
You’re welcome! Enjoy them!
I have you book-marked to look at new things you post…
Love this! ThNk you!
I need to make a mini!