If you’ve ever wondered how to make pins at home you won’t want to miss our step by step tutorial! We’ll show you a fun and easy method for making your own custom DIY pins at home with just an inkjet printer and a few craft supplies. You’ll be able to create professional looking pins that are fun to wear or share.
While this tutorial focuses on how to make custom pins at home…..you don’t have to just make pins! This method could be used to make key chains, planner charms, earrings and jewelry. It could be a fun project to take on with your kiddos. Really, the possibilities are endless if you use your imagination!
I’ve always wondered if it was possible to to make “enamel like” quality pins at home. I did a ton of research and watched a lot of videos. I completed a ton of failed experiments so that I could provide you with (what I hope is) the best possible crafting experience. I think these pins are pretty competitive with professionally made enamel pins (which require expensive equipment).
I found a really cool product that you can print any image on (Nufun Shrink with Ink Film) using an at home inkjet printer. After printing and cutting you can put the printed item in the oven to shrink it down to lapel pin size. They even have a glow in the dark version that I can’t wait to try come Halloween! If anyone has played with Shrinky Dinks in their childhood….this is similar but an improved overall product.
If you landed here by accident in search of a DIY Button Pin Tutorial you can find a complete step by step guide HERE. We show you how to turn your own artwork or photos into button pins you can make at home!

Since our website is almost purely planner stuff I decided to make some planner themed pins. If you like the planner themed graphics/images we use here you can download those images HERE. So let’s check out the final product before we get started!


It’s hard to capture the depth and dimension of these pins with traditional photos so I’ll probably have to make a video to really show off how professional these pins look! Well….let’s dive in and get started! Let’s talk about the supplies that will be needed to make your own pins at home.
“How to Make Pins at Home” Supply List:
- Planner Pin Graphics/Images
- Nufun Activities Shrink With Ink Film OR the GLOW IN THE DARK VERSION (SO RAD)!
- Rustoleum Clear Glossy Enamel Spray
- Modge Podge Dimensional Magic
- Locking Pin Backs
- Scissors or Cricut Maker Cutting Machine (optional)
- Reynolds Parchment Paper
- Gorilla Super Glue
- Oven or Toaster Oven
- Oven Mitt
- Toothpicks
- Inkjet Printer
Things to Keep in Mind Before Making Pins at Home:
[Finding Images to Use]
If you don’t already have some images that you want to use you can download the ones we used in this tutorial HERE from our shop. You can also check out Creative Market. Graphic designers sell all sorts images and designs that you can purchase and instantly download. Just search for “clipart” in the search bar and add the type of image you’re looking for like “flamingo”, “popsicles” or “pineapple” & you’ll get a ton of options to choose from.
[Sizing Your Images]
This film shrinks any image to 1/3 the size. So if you’re using your own images you’ll need to keep in mind your desired goal size up front. If you want a roughly 1×1″ inch pin for example, then your image will need to be roughly 3x 3″. You can use a program like Picmonkey to size or re-size your images.
[Distortion Will Happen]
This film will not shrink an image perfectly on a one to one ratio. Some distortion will happen and it’s especially noticeable with objects that are circles (like circle logos etc). I highly recommend that you avoid circles as they will end up looking more like eggs than circles.
After much experimentation the only way to avoid this is to purposely distort your image before printing so that when it shrinks down it comes out more like a circle than an egg (in our circle example from above). Changing the orientation of the object on the paper may help for some designs but not all….it just distorts the image differently. If you want to play around with distorting to get perfect 1:1 images you could use a program like Picmonkey to do this.
Overall I recommend picking images that have organic lines and avoiding technical images with perfectly straight lines. Just to give you an example….an image of a skyscraper with technical, straight lines would not be a good choice….but a picture of a hand drawn cartoon with natural, organic, non-straight lines would be an excellent choice.
[Color Impacts To Your Images]
During the shrinking process the colors of your DIY pins will darken significantly because all those color molecules are being crammed into a much smaller space. Steer away from using really dark colors as they may become too dark to discern after you have baked your pins. Lighter is definitely better in this case. If you need to lighten your images you could use the “fade” function in Picmonkey to do this.
[You Must Seal Your Image!]
I realize that some people may not want to go through every step herein for a kids crafting project but you absolutely MUST seal your image or it will wash away or rub off in fairly short order. So for best results always seal your image with two coats of Rustoleum clear glossy enamel spray.
[Punch Before You Bake!]
If you plan on using this methodology to make a key chain, necklace, planner charm or anything that might require a hole then you’ll want to punch that hole before baking. You can use a single hole punch for this.
If you like to watch videos more than you like reading you can check out the video I made below which is an overview of all the steps you can read through below. I still highly recommend reading the post in full before getting started on your first pin because it has all the pertinent details written down that you can step through as you go.
Step 1: Print Out Your Design onto Nufun “Shrink With Ink” Film

Take our planner printable images or whatever images you’ve assembled and print them onto Nufun “Shrink With Ink” Film. You will need to adjust your print settings to account for this special paper. Use premium matte photo paper as your paper choice and make sure that the print mode is set to high or best quality. This is a crucial step! If you send your print job through standard print mode the ink will smudge (during speed printing) and your images will be pixelated after baking.
NOTE: Keep in mind that this paper is for inkjet printers…DO NOT put this paper into a laser jet printer. It’s basically thin, specialized plastic and it will melt in a laser jet printer.
Step 2: Options For Cutting Out Your Images

So you don’t really need anything special to cut this film…scissors work great. But if you have a Cricut Makersitting around your house you could absolutely use that to cut this film. I used the “.4 mil stencil” setting in Cricut Design Space and checked the “more pressure” box. It did take 3 or 4 passes for it to cut through.
If you’re using plain ole scissors just try to keep your cuts fluid and organic (which is pretty easy with this material- it’s very forgiving). Remove all the white you can around the outside of your image.
Step 3: Bake Your Pins

I baked my pins (one or two at a time) on parchment paper at 350 degrees for just over 2 minutes. I also placed a sheet of parchment over top of the pins before putting them in to bake which helps weigh them down and keep them from curling.
Despite my photo above of all my pins placed neatly on the cookie sheet I highly recommend that you bake no more than one or two at a time. Inevitably you will get a pin or two that curls a bit and you need to push down on it with an oven mitt to flatten it out right out of the oven. If you have a bunch of pins on the sheet that curl…..you won’t be able to tamp them down with an oven mitt before they fully harden.
Here are some before and after photos of how one of my pins shrunk down. As you can see there is a bit of distortion as I mentioned earlier. It doesn’t bother me because it looks like a Happy Planner half sheet notebook or planner (which I’m totally obsessed with right now)!


Step 4: Seal Your Pins

So this step is absolutely crucial regardless of how you will be using your creation. Unless you know for certain that the ink in your printer is waterproof (which very few are)…then you will need to seal it. If you don’t seal then your DIY custom pin ink may wash off, rub off or run when you apply the Modge Podge Dimensional Magic (in the next step).
I apply 2 coats of Rustoleum Clear Glossy Enamel Spray. If the temps are warm you’ll only have to wait about 30 minutes in between coats.
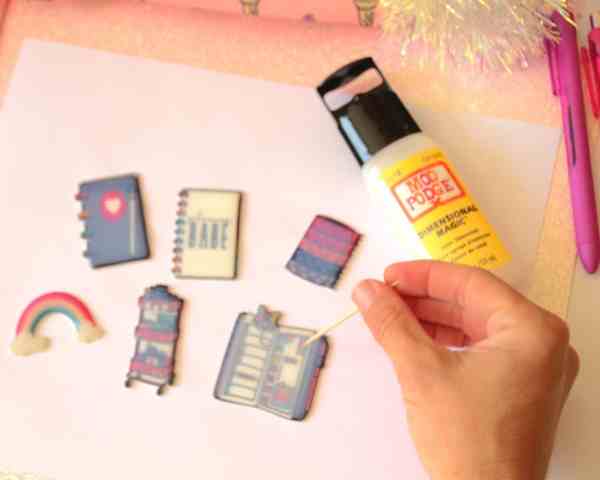
Step 5: Add Modge Podge Dimensional Magic

After you’ve sealed each of your custom DIY pins the fun really begins! You get to apply one of the coolest (IMHO) crafting products out there. It’s called Modge Podge Dimensional Magic. This is a clear, thick epoxy that dries supper glossy….it gives your images depth and sharpens up the colors. The effect is similar to enamel pins that you might purchase. It will make your DIY custom pins look like a professional did it!
You’ll only need one coat and make sure that your pins are laying completely flat on level surface. I like to outline the entire pin with a bead of Dimensional Magic and then slowly fill in from that outside bead line inwards. Hopefully this method will prevent any spill or leak of the Dimensional Magic over the edges. If you end up using too much and it does spill over the sides…just pick the pin up and place it on a pair of toothpicks so it can finish draining and dry properly.
Step 6: Remove Air Bubbles
After you’ve applied Dimensional Magicto all of your pins you’ll want to do a close inspection and see if you have any air bubbles. If you do then grab a toothpick and move it off the edge of the pin. Surprisingly, you won’t be able to pop any of the bubbles with a toothpick…you have to push them off the sides.
The packaging for Dimensional Magic says that it dries in about 3 hours….but I personally would give it a solid 24 hours to fully harden before moving to the next step.
Step 7: Add Pin Backs
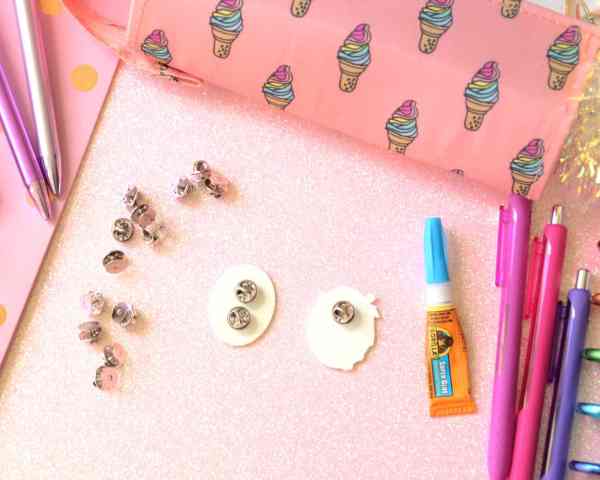
After you’ve give your pins a full 24 hours to dry you’ll be able to flip them over and applylocking pin backs. I really have to emphasize the use of these locking pin backs vs. some of the rubber pin backs you might see while shopping around. Rubber pin backs do not lock in any way and the likelihood of pin loss is pretty high. I speak from experience which is why I only use locking pin backs going forward.
Whenever possible I try to put two pin backs on for two reasons. (1) It’s extra security against pin loss…I don’t know how many times I’ve lost a totally rad pin because the backing fell off the pin. If I somehow lose one pin back there will still be one attached. Belt and suspenders my friends! (2) It keeps pins from spinning around and I can pin them in the proper orientation for maximum enjoyment!
I like to use Gorilla Super Glue because it hasn’t failed me yet, it dries clear (not yellow like some glues) and it doesn’t expand like some other glues might. You only need a drop or two under each pin back. Press the pin back into place and make sure it’s seated well on the back of your custom DIY pins.
Step 8: Add Your Custom DIY Pins To ALL the Things!

I’m adding pins to my jean jacket, backpacks and purses. I really enjoyed learning how to make pins at home. There was uber fun experimentation and I can’t wait to try some different images and possibly add glitter before the dimensional magic on my next set of pins. I really love how these turned out and I’m still making lots of them. I’ll be sure to update this post regularly with my creations so that you can see what’s possible!
I hope you enjoyed reading our DIY tutorial on how to make pins at home. If you have any questions please let me know in the comments sections below.
Our FREE graphics giveaway expires MIDNIGHT EST on Sunday, 6.5! The link below will take you to our printables shop. Add the PDF listing to your cart and use the coupon code PLANNERPINS (all caps, no spaces, type it in do not cut and paste) at checkout to get this printable for FREE! Make sure you add the PDF ONLY version to your cart. Cutting files are available for purchase in our shop HERE.


Check Out Some of Our Other Awesome Posts:


Pin This “How to Make Pins at Home” Tutorial For Later!

A glue gun in one hand, a whisk in the other- that's me in a nutshell! I'm the heart and soul behind acountrygirlslife.com. I've been crafty since childhood so I'm your go-to girl for everything crafty, delicious, and DIY. From clever crafts & printables to mouth-watering bakes- I believe in sprinkling a little handmade magic into every day. I'll help you find your creative niche at home!


I’m confused as to why there are no comments, such a good tutorial. I will be trying this to make my daughter pins for her birthday. Good job.
Do you have another shrink paper you can recommend? The regular one you recommended is no longer available on Amazon only the glow in the dark one. Thank you.